How Do you Mine Monero on a Laptop?

In this guide, we explore how to mine Monero on a Windows-based laptop. Before we get started with mining, let’s first understand the technology behind the privacy-centric cryptocurrency.
This is the third post of our Trade Code series, if you haven’t already, check out our latest post about writing your first Ethereum smart contract with minimal coding experience.
Enter CryptoNote – The Privacy Provider
Monero (XMR) is a privacy-centered cryptocurrency based on CryptoNote technology which is designed to be more anonymous than other traditional digital currencies like bitcoin.
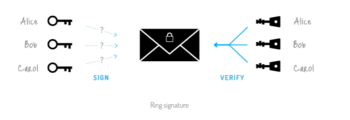
In Monero and other CryptoNote-based currencies, it is not possible to tell which party sent money and which party receives money on the blockchain due to a feature called “Ring Signatures” which ensures untraceable payments.
Let us consider that the size of the ring signature is three to better hash out how this privacy feature operates.
In Ring Signatures, a group of individuals has a secret and public key. The signer has a secret key with which they sign, but the verifier cannot trace who the signer is. In the below ring signature example, you can say, Alice, Bob, or Carol is the signer, but we cannot pinpoint who exactly.
In other words, Ring Signatures can prove membership of the signer in a group, but it cannot determine which member of the group signed.
Currently, Monero is using the CryptoNightV7 algorithm and is optimized for CPU mining.
Monero can be mined with a CPU or GPU, but not with ASIC. As such, virtually anyone with a computer can mine Monero.
How to Mine Monero
Since the hard fork of Monero made many software programs obsolete, the XMR-Stak which supports CryptoNightV7 is one of a few strong available options. XMR-Stak is a universal all-in-one miner which is capable of mining coins like Monero, Aeon, and other Cryptonight coins.
Before downloading it, make sure that Visual Studio library is properly installed. You can install from here if not already installed. Download the software XMR-Stak here.
(Just a reminder: This guide is written while mining on a Windows-based system )
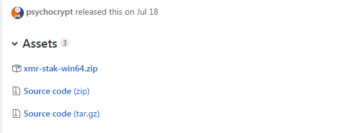
Click on XMR-stak-win64.zip to download it.
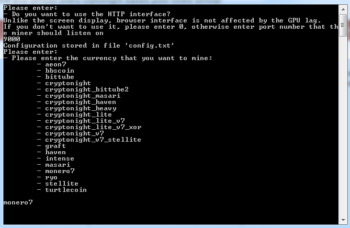
It will prompt you to enter the port number; we will use 9000.
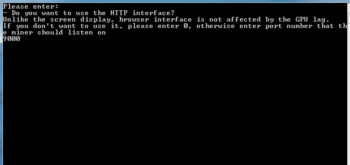
Then it will ask to enter the coin name which you want to mine. From there, enter the name. In this case, we have used “monero7” here.
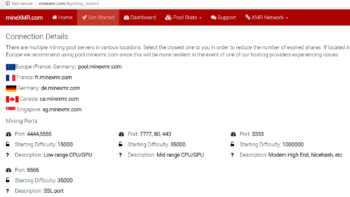
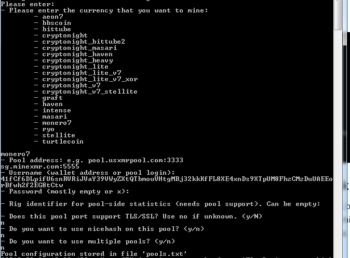
Then it will prompt you to enter “Pool address.” You can go to http://minexmr.com/#getting_started, select the pool which is nearest to you, and select the port as per your CPU configuration on the basis of difficulty.
Then it will ask you for a Username which is Monero wallet address. If you don’t have one, you can create one here.

The password can be empty; we just have hit enter or assign some password.
MineXMR pool does not support TLS/SSL, so we can put “n” [no] here. Similarly, we don’t want to use NiceHash or Multiple pools at this time so we can put “n” in both cases. Now everything is set up, and the application will connect to the pool to start mining the coin selected (In our case: Monero)
Changing the Settings of the XMR-stak

Cpu File: Open CPU file to change settings of CPU usage. To stop CPU mining, scroll to last of CPU file modify:
“cpu_threads_conf” :[{ “low_power_mode” : false, “no_prefetch” : true, “affine_to_cpu” : 0 },{ “low_power_mode” : false, “no_prefetch” : true, “affine_to_cpu” : 2 },
],
to
“cpu_threads_conf” : null,
Or if you wish to add more cores to it add:
“cpu_threads_conf” :* [* { “low_power_mode” : false, “no_prefetch” : true, “affine_to_cpu” : 0 },* { “low_power_mode” : false, “no_prefetch” : true, “affine_to_cpu” : 1 },* { “low_power_mode” : false, “no_prefetch” : true, “affine_to_cpu” : 2 },* { “low_power_mode” : false, “no_prefetch” : true, “affine_to_cpu” : 4 },* ],
This means core 0,1,2,4 of the system must be used to mine coin.
“pool_list” :[{“pool_address” : “sg.minexmr.com:5555”, “wallet_address” : “44BVzx2CMdggy96fZmaGGvh33wzse8k9MgtyWAP2gJyJTsKsA76KYrjVWtcT774rFjXwdYv2GrjrufCjx6YYtd8BP24tULU”, “rig_id” : “”, “pool_password” : “”, “use_nicehash” : false, “use_tls” : false, “tls_fingerprint” : “”, “pool_weight” : 1 },],
Hashrate Result and Connectivity
You can enter h,r,c respectively to check hashrate, results, and connection.

Or, for a graphical representation, you can also use 127.0.0.1:9000/h as this will generate an HTML page. Here, 127.0.0.1 represents your local system and 9000 is the same port which we configured in the above steps.
The port number can be changed from config file:
“httpd_port” : 9000,
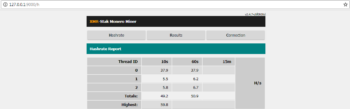
We have set up all the items to mine Monero, and the current hash rate is 468.49 MH/s. There are threshold levels for most of the mining pools below which they don’t send any XMR to the wallet. Let us suppose that the threshold value is .1 XMR.
Reward per block is 4.1 and tick happens in every two minutes or .5 tick per minute. Thus, time to mine 0.1 xmr with 60 hash per second would be:
(.1 XMR /[(60 H/s / 445.49*1000000 H/s)*4.1 XMR/ tick *.5 tick / min)] / 1440 min/ day= 250.29 days.
Hence, it would take around 250 days for the author’s old rusty system to mine 0.1 XMR or roughly $1.


Article comments